

How To Set Up Swann Camera To Internet
One of the first things that people want to know about their surveillance system is whether or not they take the ability to connect information technology to the net for remote viewing. In the past, security systems had to be monitored past a guard who was locked away in a room all 24-hour interval watching the monitors to make sure zippo would happen. The other option was to come back and review footage after something has occurred but then the damage may already be done. It'southward extremely important nowadays to exist able to view your security arrangement remotely so that you can view it in real-time. Technology has progressed so much that you're able to get notifications sent directly to your cell phone or tablet to allow you know that your security cameras are capturing an event. This can likely save you the trouble of having to replace damaged or stolen holding. Past having the ability to view your Digital Video Recorder (DVR) over the cyberspace, you will take a much better take a chance at stopping a crime from happening.
Not everyone is tech savvy. I take learned over the years that many of the things that may seem simple to those who use computers on a daily basis may exist like trying to learn some other language for most others without the all-encompassing experience. Either way, by the end of this article I hope to evidence you lot how to connect your DVR to the internet from top to lesser and then that you have a consummate understanding of how to hook information technology all up, configure all of the settings as needed, and as well empathize why you need to set it upwardly this way. Many tutorials online which testify you how to connect your security organisation to the cyberspace are very short and not detailed plenty for you to have an agreement of what you're actually doing.
First, here are some of the benefits of connecting your DVR to your network.
- Being able to watch your security cameras while y'all are abroad from the location is one of the almost of import features of current DVRs. This will give you the ability to prevent crimes likewise as keep an heart on what is currently happening in the locations that the cameras are watching over.
- Existence able to review and back up footage from your DVR remotely so that you have a copy of what is happening even if the DVR ends up getting damaged or stolen.
- Being able to configure the DVR and specialized cameras remotely. This is handy if yous notice that the DVR needs to have some of its configurations modified.
- Existence able to change settings on cameras that are all suddenly not able to meet due to weather changing. Some people have had bug where their cameras looked dandy the whole outset calendar week that they had them set up merely then of a sudden a large storm comes in and they can't see annihilation anymore and i of the camera's may have a setting which can compensate for this condition change. If you're non able to reach the location where the DVR and cameras are installed, this will allow you to change the settings from wherever you are so that you don't miss out on anything in the meantime. However, please note that some cameras practise non take these features, only for the ones that do, being able to admission them remotely is a great feature to have.
There are a few basic things you lot will demand in order to get started.
- Live Internet Connectedness. This tin can come from whatever internet access provider in your area. The faster the speeds they are able to provide you with, the meliorate. Withal, it'due south withal possible to view your organisation remotely with a slower connection such equally DSL. Usually the internet service provider volition provide you with the choice to rent a modem from them unless you have your own available for setup.
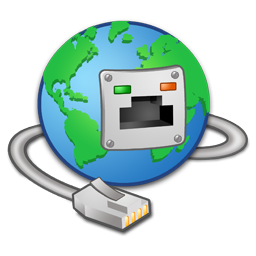
Internet Connection
- Router. A Router is a device which forward the information between your network connections. This will allow you to connect multiple devices to your unmarried internet connection. Many homes today currently have Wi-Fi Routers that will allow you to connect your devices to your net wirelessly. Y'all will non need a wireless router to admission your DVR remotely, and so just near any router will practise. Some of the larger router brands are Linksys (Cisco), D-Link, Netgear, Belkin, and even Apple.
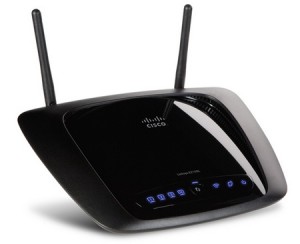
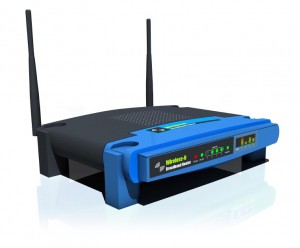
Routers
- Ethernet Cables. These are usually sold as CAT5 (Category v) cables which are used to connect you lot to the internet. Most DVR's with the ability to exist viewed remotely will come with a network port that you can attach your cat5 cable to. Sometimes the manufacturer will even include a cable with the organization but unless you are planning on connecting your DVR nearly your router, most of the times the cable is besides brusque. Be sure to measure out how many anxiety of cable you volition demand before purchasing your system. Y'all will also need one Ethernet cable to connect the modem to the router. Routers usually come with their own short Ethernet cable as well.
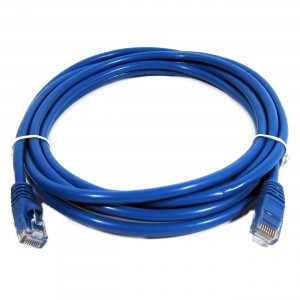
Ethernet Cablevision
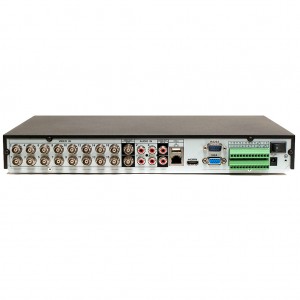
- DVR with the power to exist remotely viewed. Non all DVRs have the power to be viewed remotely. Some DVRs are just for recording and volition not have the features that let for you to connect to them through the internet. Brand sure the DVR y'all have is capable of doing so past contacting the manufacturer or checking the manual that came with it.
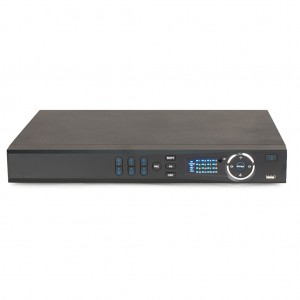
DVR
- Monitor. For the initial setup, you volition need some sort of monitor so that you can connect your DVR and view all of the settings yous are configuring. Once these settings are configured, you will no longer need the monitor if y'all are only going to view the arrangement remotely. Some DVRs have outputs that will likewise permit you to employ a television equally a monitor by connecting it using BNC, HDMI, VGA, or fifty-fifty composite RCA connections depending on the devices that y'all buy.
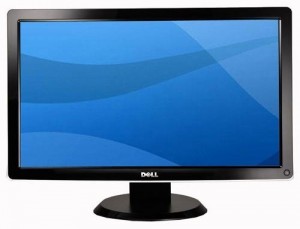
Monitor
Getting Started
- Make sure that your Modem is continued to the internet. Usually modems will have a series of lights on the front which are status lights to allow you know that it'south currently working. All modems are dissimilar then many sure you get the data for yours from your service provider or its transmission. Getting the model setup and connected is across the scope of this article and this stride needs to be completed before moving forward.
- Connect your modem to the internet port on your router. Usually your router will accept one port for the internet connection. This port is usually away from the other ports on the back of the router which are for the devices which will be connecting to the internet. Use a cat5 cable for this connection.
- Connect your DVR to one of the data ports of your router. Nigh routers come with at least 4 ports for hardware that will be connecting to the internet. You will likewise be using a cat5 cable for this connection. For the initial setup, y'all will not demand the long cat5 cablevision if you lot are planning on relocating the DVR to a location that's far away from the router. You may always motility the DVR after the initial setup then the cable that came with your DVR should be fine.

- Connect your DVR to your monitor. This can be done using any of the methods bachelor depending on the type of monitor you are using and DVR outputs available. If yous have an HDMI or VGA port on both the DVR and Monitor, one of these are the preferable ones to exist used.
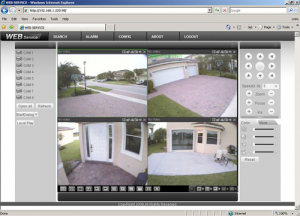
Now that you have your hardware setup and continued, make certain everything is powered on and working. Next, check out the next footstep to configure your router and DVR and you volition soon be able to view it remotely. I volition be using a Techpro Security DVR which I purchased from SecurityCameraKing.com. All of their DVRs have the same interface when you log into them so configuring them volition be pretty much the same. Other DVR'due south may have menus that wait a flake different but the settings are all generally the same. Aforementioned goes for the Router settings.
Configure your DVR
- Log into your DVR using the username and password provided by the manufacturer. If this DVR has already been previously configured, utilise the admin login information.
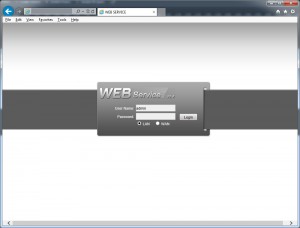
DVR Web Service Login Page
- Select the menu for Network Settings. In this section you will exist able to assign an IP address to the DVR. This will be an internal static IP address. (This usually begins with 192.168.XXX.X). I would suggest using these settings to go started, you tin always change them afterward.
- IP ADDRESS: 192.168.i.110 (This will be the ip address of the DVR)
- SUBNET MASK: 255.255.255.0 (Leave this unless your network has a modified subnet)
- GATEWAY: 192.168.1.i (This will normally be the IP Address of your router)
- TCP PORT: 37777
- UDP PORT: 37778
- HTTP PORT: 88 (You can use port eighty just in that location are some Internet Service providers which cake the utilize of port 80. I ordinarily just alter it to be on the safety side.)
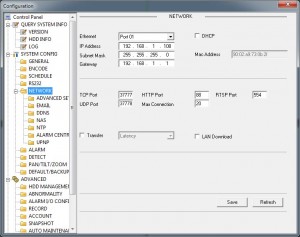
DVR Network Settings Menu
- Configure Your Browser's Security Settings In Lodge To Download the DVR Web Service. In order for you to connect to your DVR internally or externally inside your network, you're going to take to brand certain that your browser is able to download the web service from the DVR. Just go to Tools > Net Options > Security.
IE Tools Menu
In this tab, you will run into a push button that says Custom Level.
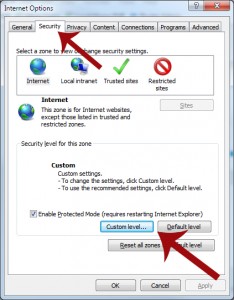
IE Security Custom Level Button
Click it and brand sure that the option for "Download Unsigned ActiveX controls" has "Prompt" (or Enable) selected instead of Disable.
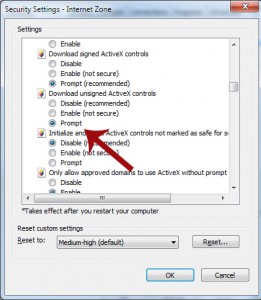
Unsigned ActiveX Prompt
This will make certain that when y'all admission your DVR, the prompt will allow yous to install the ActiveX spider web service that allows you to remotely access and configure your DVR. Yous can exercise the same for the other ActiveX settings as well. One time you are washed, close Net Explorer then restart it to brand certain the settings have taken change.
- Connect to Your DVR Internally Using Internet Explorer. You lot should at present be able to connect to your DVR internally inside your network. This is a fleck different from connecting to it externally. You will use the Static Internal IP Address and Port number that you configured on your DVR in club to exercise this. This will be '192.168.one.110:88' as you lot take configured in the second step. The ':88' at the cease is the port that you'll be using to connect to the web service of your DVR.
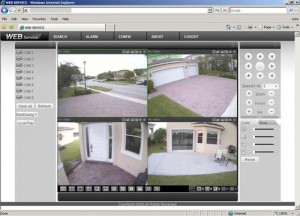
Log Back Into Your Web Service
- Port Forward Your Router. The adjacent affair you're going to desire to do is port forward your router. This is going to exist necessary in society to connect to your DVR from a remote location. If yous were to only type your external IP accost into the browser, your router is non going to know which device you are trying to achieve. At that place could be multiple computers and devices on that network so you need to tell the router which one to specifically connect to by assigning a sort of map to all of the ports y'all take configured.
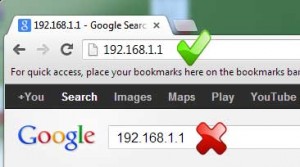
- Log in to your router using the gateway IP address and username and password that has been set to it. By default, nearly routers take their default gateway IP address set to 192.168.i.1. This is what you will blazon into the URL bar of your browser. Once y'all put that in and hit Enter, a window should pop up asking you to log in. If you haven't fabricated any changes you should be able to put 'admin' into the username and 'admin' into the password field likewise. Some Routers may have their countersign defaulted to 'password'. You will have to bank check your router manual or with your network ambassador to be sure. Y'all tin can besides search on Google to notice out the defaults.
Login to your Router
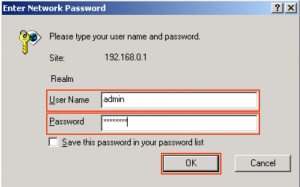
Use your Default Info If you Oasis't Changed It
- Frontwards the Ports. Find the window or tab that is either called 'port forwarding' or 'apps and gaming'. Get alee and add a new port forwarding rule. The application name field is where yous will put in anything you want that is descriptive to the device y'all're port forwarding. In this case you can just put in "DVRWEB" to signify the DVR Web Service connectedness. External Port can be 88 (or whatever port yous set information technology to on stride 2), Internal Port is as well set to 88, Protocol will be 'both' tcp/udp and the Device IP will exist the IP of the DVR. In this case you will make sure it'south '192.168.1.110'. Make sure the rule is enabled by checking the box if in that location is ane and save the rule. And so do the same for your TCP And UDP ports that were set on the DVR.You should have:
- DVRWEB – 88 – 88 – BOTH – 192.168.1.110 – Enabled
- DVRTCP – 37777 – 37777 – BOTH – 192.168.1.110 – Enabled
- DVRUDP – 37778 – 37778 – BOTH – 192.168.1.110 – Enabled

Port Forwarding Menu
- Find out your External IP Address. Discover the IP accost of the network you're currently setting up the DVR at by typing in "WHAT IS MY IP" into google. You will become your public IP Address and brand sure to make a notation of information technology. This is the address that you are going to utilise in order to connect to your DVR when you are in another location.
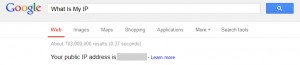
Observe out your external IP
- Connect from the Outside. When yous take the power to connect from outside of the network you are in, type in your Public IP Address into the URL bar on Net explorer and brand sure to add the ':88' at the terminate. Yous should see the ActiveX web service prompt. If you are able to connect to the DVR internally but are unable to one time you are outside of that network, it will more than likely be a port forwarding issue. Bank check your settings and try again.
Connect To your DVR Externally
- Log in to your router using the gateway IP address and username and password that has been set to it. By default, nearly routers take their default gateway IP address set to 192.168.i.1. This is what you will blazon into the URL bar of your browser. Once y'all put that in and hit Enter, a window should pop up asking you to log in. If you haven't fabricated any changes you should be able to put 'admin' into the username and 'admin' into the password field likewise. Some Routers may have their countersign defaulted to 'password'. You will have to bank check your router manual or with your network ambassador to be sure. Y'all tin can besides search on Google to notice out the defaults.

How To Set Up Swann Camera To Internet,
Source: https://www.securitycameraking.com/securityinfo/how-to-connect-to-your-dvr-over-the-internet/
Posted by: sanderspossent86.blogspot.com
0 Response to "How To Set Up Swann Camera To Internet"
Post a Comment